
Run skills · Balance 27 · Steam build 26572818
Board order: adjacency, front, behind and opposite
Where adjacent, front, behind, above and opposite point on the six-slot board, with proposed layouts for Onsetra, Dracana, Dryadell, Steamscuttle and Aegistruct.
Ranked data: 6 Nov 2026 to 19 Nov 2026, Balance 27.
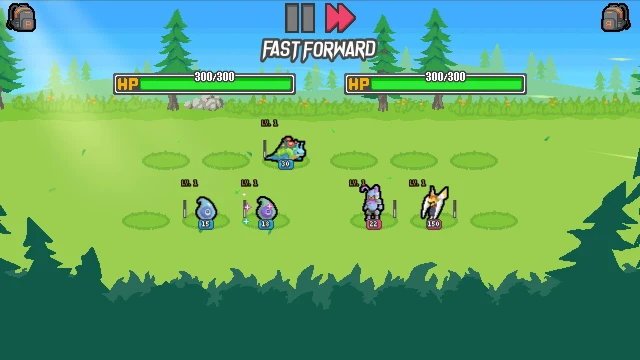
Many abilities name a place on the board: "adjacent", "the ally behind", "the ally above", "the enemy opposite" or "top middle". These words follow fixed rules on a fixed grid. Before you press Battle, you can check every positional effect on your team and know whether it reaches its target.
What does the board look like from your side?
Your team has six slots in two rows of three: a top row and a bottom row. The enemy is to your right.
- Front is to the RIGHT, toward the opponent. Behind is to the LEFT.
- "In front" and "behind" stay in the same row. The ally behind a unit is the slot immediately to its left in that row.
- "Above" and "below" stay in the same column. The ally above a bottom-row unit is the top-row slot directly over it.
- Adjacent means touching above, below, left or right. Diagonal slots are not adjacent.
The diagrams use short slot names: tl tm tr for the top row (left, middle, right) and bl bm br for the bottom row.
| Slot | Adjacent slots | Ally behind | Ally above |
|---|---|---|---|
| top left (tl) | tm, bl | none | none |
| top middle (tm) | tl, tr, bm | tl | none |
| top right (tr) | tm, br | tm | none |
| bottom left (bl) | tl, bm | none | tl |
| bottom middle (bm) | bl, br, tm | bl | tm |
| bottom right (br) | bm, tr | bm | tr |
The full rule text is on Adjacency & Targeting.
Why does a middle slot matter more for adjacency?
A row-middle slot touches three allies: left, right, and the slot above or below it. A corner touches only two. An effect that reaches "adjacent allies" therefore reaches the most units from tm or bm.
The grid has no triangle. No three slots are all adjacent to each other. Take any two neighbours of a middle slot, such as bl and br around bm, or bl and tm. Those two never touch each other. If you plan for three units to support each other through adjacency, at least one pair will miss.  Link Cable is the only exception, and it is covered below.
Some trinkets also name a column.  Rally Flag and
 Quick Flag reward the leftmost column, which is your back.
 Speed Crest and
 Earth Crest reward the rightmost column, which is your front.
 Pom Berry buffs whoever stands at bottom right when you buy it, because Items take effect at purchase.
Where do Onsetra and Dracana have to go?
 Onsetra says "The ally behind applies its Ongoing abilities 1 additional time(s)."
 Dracana charges "the ally behind" each time it casts. In both cases, the target is the slot immediately to the LEFT of the support, in the same row. A unit in the other row is never "behind", and neither is a unit two slots away.
Rules that follow from the effect text:
- A support in a left corner (
tlorbl) has no ally behind. Its directional effect does nothing. - Dracana "can't receive charge". A Dracana behind another Dracana wastes the charge from the front one.
- Onsetra helps only an ally with an Ongoing ability. A unit with only cast effects gains nothing from it. Each Batomon's card shows its trigger, so check that the target's ability is marked Ongoing before you place Onsetra in front of it.
 Fumungus,
 Furnadon and
 Cinnabark are examples. The rules are on Ongoing.
- A shiny Onsetra works differently. It affects "adjacent allies" instead of the ally behind, so check the card you actually own.
- Levels change the size of the effect, not the target. Onsetra goes from 1 to 2 to 3 extra applications at levels 1–3. Dracana charges 1, 2 or 3 seconds.
- A normal
 Celestia disables Ongoing Batomon in its own row on both teams. Do not put your own Celestia in the same row as Onsetra and its target.
 Coalem fills the charge slot in this example because its level 2 cooldown is 15 seconds, so charge moves it toward a cast it would otherwise wait a long time for. Charge advances current cast progress. It does not change the cooldown, and extra charge past a completed cast is discarded (Charge).
Fumungus is a normal Pantra shop species with an Ongoing Damage bonus based on enemy Poison stacks. Onsetra belongs immediately to its right. The extra Ongoing application matters after the enemy gains Poison; it does not create a bonus from an empty stack. Fumungus applies Poison with its own casts. All four occupied slots can belong to a Pantra run. The two empty slots isolate the target pairs, rather than describe a complete winning team.
Where does the Grass ally go for Dryadell?
 Dryadell casts and then triggers "the Grass ally above". "Above" means the top-row slot in the same column. So Dryadell must be in the bottom row, with a Grass Batomon directly over it:
- Dryadell at
bltriggers a Grass ally attl. - Dryadell at
bmtriggers a Grass ally attm. - Dryadell at
brtriggers a Grass ally attr.
A Grass ally that is diagonally up from Dryadell is not "above" it. A Dryadell in the top row has no ally above, so it triggers nothing. Its Multicast at levels 2 and 3 means more casts, and On Cast resolves for each cast in the sequence (Multicast, On Cast).
 StalagroveLv 2
 BambudoLv 2
- DryadellLv 2
- DryadellLv 1
Stalagrove and Bambudo are both Grass and both from Pantra, like Dryadell. That keeps this layout within one region's shop.
How should a middle support use adjacency?
A support that affects "adjacent" allies does the most from a row-middle slot, where it has three neighbours. Each effect has its own conditions, though, so check which neighbours actually qualify.
 Steamscuttle charges "adjacent Fire and Water allies". A neighbour without either type gets nothing. Another Steamscuttle cannot receive charge.
 Aegistruct gains Shield at battle start equal to the Shield of adjacent allies. It ignores "other Aegistruct", so two of them side by side do not feed each other.
 SnapscaldLv 2
 PyrokamiLv 2
- SteamscuttleLv 2
 LampletLv 3
In this layout, Lamplet cooldown is 4 seconds since 1.5.1, so charge from Steamscuttle helps it reach its next cast. Pyrokami is another Jinto Fire unit, so it qualifies for the same charge. The board uses only one level 3 Lamplet: once you own a species at level 3, normal shop rolls stop offering it (Monster pool & shop). Snapscald reacts when any ally of level 3 or above casts. That trigger has no position, so Snapscald is at top middle only to collect charge. The Snapscald and Lamplet guide covers the plan itself.
- CoalemLv 1
- CoalemLv 2
- AegistructLv 2
- StalagroveLv 2
Stalagrove gains Damage whenever your team receives Shield, so its own ability works from any slot. It sits next to Aegistruct here only because its own Shield adds to Aegistruct's total. The published rules do not say how the battle-start effects of Coalem and Aegistruct are ordered against each other, so the final Shield total is not something you can read off this layout.
What do "opposite" and "top middle" target?
"Opposite" points at the mirrored slot on the enemy board.  Reapra knocks out "the enemy opposite of this" at levels 1–3. At level 4 it switches to a random enemy.
 Vengrieve also targets the monster opposite.
The limit is that you cannot see your opponent while you shop. The game draws the saved board of the day only after you press Battle. Placing Reapra knocks out whatever sits in the mirrored slot; you cannot choose a specific enemy. An enemy Reapra works the same way against your board.  Cherubble gives adjacent allies Protect, which prevents one Knockout (Knockout).
 Magic Lasso (an Item, cost 50) gives you "an exact copy of the enemy's top middle Batomon in the next battle". The copy keeps its level, shiny state, permanent bonuses, added types and tracked progress. If the enemy's top middle slot is empty, the Lasso takes the first occupied slot instead (Permanent vs Battle-only).
The Lasso has the same limit as Reapra: you buy it before the opponent is drawn, so you do not know what you will copy. The rules do not say which slot counts as "first" when top middle is empty, or where the copy goes on your side. Do not plan around either of those.
Your own top middle matters in two ways:
- It can help you.
 Power Crown,
 Haste Crown,
 Winged Crown and
 Master Crown buff your top middle Batomon, and
 Alpha Crown sets your team's Damage to your top-middle monster's Damage at battle start.
- It can help the opponent. Your board is saved and used as an opponent in other players' runs. A player who meets your board with a Lasso gets a copy of your top middle unit.
The data does not measure which of these weighs more, so there is no general recommendation here. Choose your top middle on purpose.
When does Link Cable change these rules?
Link Cable says "All of your team's monsters are now considered adjacent to each other." With it, any "adjacent" effect reaches the whole team. That covers Steamscuttle's charge, Aegistruct's Shield count and a shiny Onsetra. It is the only way to build the triangle the grid cannot make.
Treat it as an exception, not the base rule:
- Its text covers adjacency only. It says nothing about "behind", "above", "in front" or "opposite". Keep placing Onsetra, Dracana and Dryadell targets as shown above.
- Since 1.5.1, the game marks Link Cable as a drawback trinket.
 Burglar cannot steal it as the extra trinket after a gift pick. Gift Items never offer it.
- You can still choose Link Cable when a normal trinket gift offers it (Patch 1.5.1).
Are the comp board diagrams the best formation?
No. The Comps board diagrams show each comp's frequent units, each in its own most-common slot. Each slot is measured separately for each unit. When two units share the same most-common slot, one of them moves to a free slot. The result is an arrangement built from separate counts, not a board that players were observed fielding together. It does not prove that any position is optimal. Check these diagrams with the same rules as your own board.
The Stalagrove + Aegistruct comp uses the Shield units from the layout above. Check whether its Aegistruct has Shield neighbours.
 GeminissLv 1
- AegistructLv 2
- CoalemLv 2
- StalagroveLv 2
 DraconarchLv 1
 CraghornLv 3
 Trainer: Monster Ranger
What should you check before pressing Battle?
The shop has no timer, so run this check every time you change your team:
- Read each effect. Mark every ability that names "adjacent", "behind", "in front", "above", "opposite", a row, a column or top middle. Effects that react to the whole team, like Snapscald or Stalagrove, need no position.
- Count valid neighbours. For each adjacency effect, count the touching allies that meet its condition (type, Shield, no other copy of the same unit). Give the support a middle slot if it has more valid neighbours there.
- Check directional targets. The ally behind is immediately to the left in the same row. The ally above is in the same column, top row. A corner or the wrong row means no target.
- Inspect top middle. Decide on purpose what stands there. Crown trinkets depend on it, and an opponent's Magic Lasso copies it.
- Verify actual levels and variants. Merges change values, and a shiny Onsetra or other shiny unit may target differently. Read the card you own, not the shop card you remember. Merging rules are on How to play, and team planning is on Planning a team.
If every positional effect passes these checks, your placement is a known setup and not a guess, even though the data cannot rank one valid layout above another.