
Start here · Balance 27 · Steam build 26572818
Your first 10 runs in Batomon Showdown
A plan for your first ten runs. Learn the shop, merge and lock, commit to one type or trigger, then read your losses with the comps and meta pages.
Ranked data: 6 Nov 2026 to 19 Nov 2026, Balance 27.
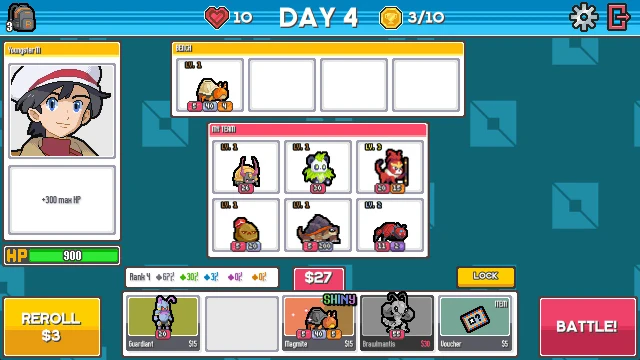
Ten runs are enough to go from pressing buttons to playing a board with a plan. Runs 1–3 teach the shop, runs 4–6 teach you to commit to one plan, and runs 7–10 teach you to read a loss.
What a run is and how it ends
A run alternates between a shop and automatic battles. It ends at 10 wins, or when your lives run out. How to play covers the full loop: lives, what a loss costs on each day, and who you fight. Read it once before your first run.
Two facts from that page affect almost every tip below:
- The shop has no timer. You fight a saved board, not a live player, so you can read every card before you press Battle.
- Losses get more expensive. From day 5, each loss costs 3 lives. A board that is weak on day 5 costs you more than a board that is weak on day 2.
If you play Ranked, each finished run changes your stars by your wins minus 5. A new profile starts at Bronze 8, and star losses at Bronze 8 with 0 stars are discarded, so your early runs cannot drop you lower. How ranks work explains stars and MMR.
Runs 1–3: learn the shop
In these runs, winning is not the goal. The goal is to know what every part of the shop does and to stop making avoidable mistakes. The full shop rules are on Monster pool & shop.
Buying
- A normal shop has five slots. Four offer Batomon. The fifth offers an Item while you still have an Item use that day. Without an Item use, it offers another Batomon.
- A bought Batomon goes to the empty slot you choose. Otherwise it goes to the first free team slot, then to the first free bench slot.
- Your team holds 6 Batomon and your bench holds 4. If all ten slots are full and a purchase cannot merge, it goes into overflow. While overflow lasts, reroll, lock and Battle are disabled. Sell something before your slots fill up.
Merging
Three level 1 copies of a Batomon merge into level 2, and two level 2 copies merge into level 3. Each merge opens a trinket gift. A higher level can change a Batomon's cooldown, Multicast, stats and ability numbers. Levels & Merging lists the exceptions. For example,  Swoonet needs only two copies for each level.
Some practical results of these rules:
- A copy of something you own is often the better buy. It moves you toward a merge, and the merge gives you stats and a trinket.
- Merging keeps your resale value. Sell value uses a level factor of 1 at level 1, 3 at level 2 and 6 at level 3. The base sell value of a merged Batomon is about the same as the total of its ingredients, so merging does not lower what you get back when you sell.
- A level 3 Batomon clears space in the shop. The shop stops offering a species you own at level 3 or above, except Swoonet. Your later shops then show other species.
Rerolling and locking
- A reroll costs $3 and replaces all five slots. If you have a free reroll, the game uses it first.
- A lock is free. It keeps the current offers for the next day, then clears.
- A reroll removes the lock. If you lock a shop and then reroll, the locked offers are gone.
Use the lock when the shop shows a copy you need and you cannot afford it. Lock, press Battle, and buy it tomorrow with the new day's gold.
Items
You use an Item as soon as you buy it. The daily Item budget starts at 1. The shop greys out an Item that would do nothing, so a grey Item is not a choice you missed.
 Green Stone costs 0 and transforms a random Common monster into an Uncommon monster. "Random" matters here:
- If you own exactly one Common Batomon, the Stone must pick that one. Use it when that is the result you want.
- If you are collecting copies of a Common for a merge, a transformed copy stops matching the others. You lose that merge progress.
- A transformation keeps permanent bonuses, added types and shiny state. You do not lose stats you already earned.
Runs 4–6: pick one plan
Once the shop feels familiar, start each run with one question: what is this board for? Pick one plan, either a type or an ability trigger, and buy toward it.
The reason is in the effect text. Type effects only count allies of that type. Trigger effects only reach the exact slot they name. Six strong Batomon that miss each other's effects lose to six average Batomon that all feed one effect.
A type plan
A Water start shows how this works:
 Dewlotl costs 10. "When an ally levels up," it gains Damage and Heal permanently, so it rewards every merge you make.
 Emperooze costs 10 and gains Damage and Heal permanently.
 Aster says "Adjacent Water allies gain +35 Heal permanently." The more Water Batomon touch it, the more value it gives.
- Later,
 Torrantler triggers adjacent Water allies.
 Trainer: Swim Coach
Slots touch only above, below, left and right. Diagonal slots are not adjacent. The top middle slot touches three other slots, so it is a good home for an "adjacent" effect. Adjacency & Targeting has the full rules.
A trigger plan
Some Batomon trigger an ally in one exact direction:
 Dryadell
 Cicadence
"Above" means the same column, one row up. Put the trigger Batomon in the bottom row, directly under its target. If you put it in the top row, there is no ally above it, so its trigger is wasted. It still makes its ordinary cast.
How to commit
Around days 3 and 4, look at your team and your bench. Find the type or trigger that already has two or more pieces. Make that your plan. From then on:
- Buy pieces of that plan first.
- Sell Batomon that do not fit, once they block a slot.
- Leave a shop that offers nothing for your plan, unless a copy toward a merge is on sale.
Runs 7–10: read your losses
By now you lose for reasons you can name. After each loss, before you buy anything, ask these questions:
- Did the fight reach Sudden Death? At 30 seconds, a sandstorm starts to hit both teams, and its damage doubles every 3 seconds. If your battles often last that long, your board deals its damage too slowly.
- Did Burn or Poison finish you? Shield reduces status damage before it absorbs the rest.
 Sirenade and
 Runerock remove debuffs from your team.
- Did a key Batomon die before it cast? A knocked-out Batomon stops casting, and its Ongoing effects stop.
- Did your triggers fire? Check every "above", "behind" and "adjacent" in your effect text against the board.
How to read stats explains the numbers on the Batomon and trainer pages.
Use the comps, the meta and the Team Builder
Comps groups observed ranked boards by their core Batomon and shows how often each comp reaches 10 wins. Here are the current leaders:
| Comp | Tier | Runs | 10-win finish | Most played trainer |
|---|---|---|---|---|
   Miasmaw + Drumire | S+ | 193 | 36.5% | Chemist |
   Ratacomb + Lumijel | S | 57 | 35.1% | Monster Ranger |
   Bonshell + Opalion | A | 60 | 27.1% | Monster Ranger |
   Cobrex + Fumungus | S | 170 | 25.7% | Chemist |
   Berroon + Craghorn | B | 83 | 24.7% | Monster Ranger |
Every comp page has a Team Builder link that starts from that comp. The comps pages now show trinkets from observed final boards. Item ideas still come from catalog effects, because the source has no item records.
The Water plan above shares its key piece with an observed comp:
 Plunderbird + Aster is an observed comp built around Aster, with
 Shelldra in its core. The diagram is a suggested arrangement of frequently seen units, not a measured formation. Compare its effect requirements with your own board.
- ShelldraLv 2
- TorrantlerLv 2
 DirgefinLv 2
- PlunderbirdLv 3
- AsterLv 2
- SirenadeLv 2
Trainer: Swim Coach- Tier
- C
- 10-win finish rate
- 15.9% 11 of 69 finished runs
- Runs
- 69 59 players
- Play rate
- 1.4%
- Most played trainer
- Swim Coach
Load this board in the Team Builder → Compare all comps →
Meta shows win rates for trainers and Batomon over 6 Nov 2026 to 19 Nov 2026. A trainer's pick share and its win rate are different numbers:
 Witch appears in 7.1% of observations but wins less often (15.6%) than
 Monster Ranger (27.9%).
Easy trainers for new players
You choose a trainer before the first shop, and the trainer stays for the whole run. For your first runs, pick a trainer with a simple effect that also does well in ranked data. The chart shows the trainers with the best ranked win rates for Balance 27:
Show the numbers as a table
| Trainer | Value | Sample |
|---|---|---|
| Swim Coach | 28.2% | 3,552 observations |
| Monster Ranger | 27.9% | 4,766 observations |
 Chemist | 24.6% | 3,374 observations |
 Gentleman | 24.3% | 2,376 observations |
 Mad Scientist | 23.5% | 1,262 observations |
 Masked Man | 22.5% | 1,441 observations |
 Twins | 21.6% | 3,765 observations |
 Burglar | 20.3% | 2,222 observations |
 Gamer | 20.3% | 1,985 observations |
 Redhead | 19.1% | 2,197 observations |
Monster Ranger: "Start with an Uncommon monster. Get another copy of that monster every 2 days." You never have to hunt for your first merge, because the copies arrive on their own. Pick a plan around that monster. Monster Ranger is one of the three trainers with the best ranked win rate (27.9%, rank 2).
Swim Coach: "Gain a random Water monster each day." The trainer picks your type for you. Each free Water monster saves gold and feeds Aster or Torrantler. Swim Coach is also one of the three trainers with the best ranked win rate (28.2%).
 Youngster: "Gain 3 free rerolls every day." Free rerolls carry into later shops, so this effect is a good way to practise rerolling without losing gold. In ranked play, however, Youngster wins less often (16.3%) than Swim Coach. Use Youngster to learn the shop, then move on.
Choosing a trainer compares all trainers in more detail.
A checklist for each shop phase
Every shop
- Count your free team and bench slots before you buy. Overflow blocks reroll, lock and Battle.
- Look for copies of what you own before anything new.
- Lock the shop if a needed copy is there but you cannot afford it. Do not reroll afterwards.
- Read the Item. If it is grey, it would do nothing.
- Check every "above", "behind" and "adjacent" effect against its slot before you press Battle.
Days 1–4
- Buy cheap copies and make your first merges. Each merge also gives you a trinket.
- A loss costs fewer lives now, so this is the time to try things.
- Use Green Stone only when its random target cannot break a merge you are building.
- By the end of day 4, choose your type or trigger plan.
Day 5 onward
- Each loss now costs 3 lives. Spend your gold on strength for the next fight, not on long plans.
- Sell Batomon that are off plan to make room and gold for plan pieces.
- Watch your fight timer. If your battles reach Sudden Death, you need faster damage.
After every loss
- Name the cause: too slow, status damage, an early knockout, or a missed trigger.
- Fix that one cause in the next shop before you try anything else.
- After the run, compare your board with a comp on Comps that uses the same type.
Play your ten runs in this order, and by run 10 you will know why each Batomon is on your board.
Reviewed for 1.5.1
After you choose Battle, you get 1.5 seconds to cancel. Then the game hides Cancel and draws the opponent for that day. Another search on the same day keeps that board. The new 1.5.1 write-up explains the change.